146 Mini Art Ideas
/

146 mini art ideas to inspire you to get creative
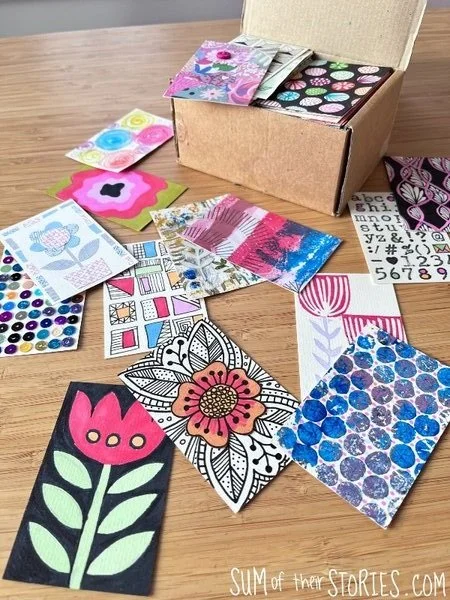
Back in October 2024 I found a box of old business cards in amongst my dad’s belongings that I had inherited. I kept a couple, putting them in an old photo album and decided to turn the rest into a daily art project to share on Instagram.
I had 146 business cards to use and started my daily art challenge on 9th October so that I would finish on 3rd March, just in time to commemorate the anniversary of dad’s passing.

Dad’s business cards were the standard old school UK size, 85mm x 55mm (that’s 3.34” x 2.16”) and made of a slightly textured, matt off-white card with print on one side, blank on the back. Dad retired back in 2003 and these were from the last position he held. I gather in the US business cards are a tiny bit longer and thinner.
One of the things I liked best about this art challenge was the fact I only had 146 cards to work on, so if an art experiment went wrong I had to just keep going and try to find a way to make it work, luckily I didn’t have too many disasters! Some of these mini art pieces are more successful than others but I’ll share them all here, after all different peole like different things and you might love one that I’m not so keen on.
Rather than showing them in the order I made and shared them on Instagram I’ve grouped them into art types or techniques so I can explain the materials used, technique, method etc more easily.
Brace yourself, this is a long article with lots of photos!
Doodles, Zentangles and Zendoodles
Doodling is one of my favourite things to do so it features quite heavily here in my mini art project.
I am no expert on zentangle or zendoodles but it’s an art style I really love. I find it hard to define a Zentangle or a Zendoodle from just a regular doodle but I’ve done my best to categorise them here. I think this first batch of mini art pieces come under the “zentangle” definition but some might veer into zendoodle territory.
Zentangles

These zentangles were all drawn straight onto the back of the business cards.
All the fine black lines were done with a Pigma Micron 10 or 5
The colourful fine lines were made with Stabilo fineliners
The black “colouring in” was done with a fine point sharpie
The larger colourful areas were all coloured with Promarkers
I mostly drew inspiration for these from artists I see on Instagram like Zentangle Daily and Meditative doodles.
Zendoodles
This next batch I’d describe more as zendoodles, they have elements of zentangle but bring in more doodley elements too.

All these black lines were made with Pigma Micron pens as before, and the coloured fine lines were made with Stabilo fineliners. Most of the colouring in was once again Promarkers.
Top right was created with a kitchen roll/paper towel experiment. I dotted some kitchen paper with kids washable felt pen then sprayed it with water and left it to dry. I glued this to the business card and then doodled over the top with a black fine liner.
Bottom left was another experiment. This time I tore washi tape and placed it vertically then used red and yellow watercolours over the top. Once that was dry the washi tape was removed. It wasn’t as impactful as I had hoped so I added some doodles with a black fineliner.
Centre bottom used a simple gold pen.
Bottom right was promarker squares with black fine liner doodles plus some extra doodles done with a Faber Castell Pitt Artist Pen Brush in white. I’ve yet to find the perfect white pen for doodling, this one is ok but needs a few layers to get a good clear white line.

These last 3 that I’ve included as Zendoodles but I might be stretching the definition a little far!
A black brush pen and colourful sharpie dots
All done with a fine black sharpie
A black fine liner plus some promarker colouring
Doodles and Drawings
Most of these mini art pieces are just basic doodles or drawings on various background. There are quite a lot of flowers - I like flowers!

I’ve put this batch of cards above together because they are all created with the same pens. All the colour here is Promarkers, every thin line is a Pigma Micron pen and the thicker black lines were all done with a fine sharpie.

Above we have:
Love, inspired by Artist OMG on instagram (theirs is MUCH better than this!)
Dots and lines with colourful sharpies (not my best work imo)
Here I glued a pretty page from a magazine ad onto the business card then got a bit stuck with what to do next so this one sat on my desk for a few weeks. In the end I just drew over it with a sharpie
The next 3 are all doodles and shapes with promarkers, sharpies and black fine liners as before
The background here was dots of washable felt pen, sprays with water and left to dry. The some leaves drawn with black fine liner
Gold and silver marker pen doodle
Promarker simple flowers with fine liner doodles over the top - this is probably my most favourite way to draw/doodle, I do this all the time!
Scribble Fill Colouring
I’m calling this next art style scribble fill. It’s what I imagine we all did as kids. You scribble all over the page and them colour in the shapes. Easy peasy and lots of fun.

Die Cuts and Punches

These cards were all decorated with paper cut with either paper punches or die cuts.
Red and pink paper from old greeting card envelopes cut and punched into heart shapes
More colourful envelopes punch with various paper punches
A “paint splattered with a toothbrush” background, doodles stem and leaves and a die cut flower
Die cut flowers and the matching “matrix” or waste, discard, leftovers
Weaving
You can make lovely textured art by weaving directly onto the card.

yarn warp and a mix of fabric, ribbon and yarn weft
yarn warp and a mix of yarn and string/twine weft
paper weaving
Sequins
Such an easy peasy art idea - glueing on sequins. These look much better in real life than they photograph.

Simply glue sequins on, in rows or randomly. All the same colour or all different colours. Something like Anitas tacky glue or Bearly Art Precision glue is good for this.
Dot Art
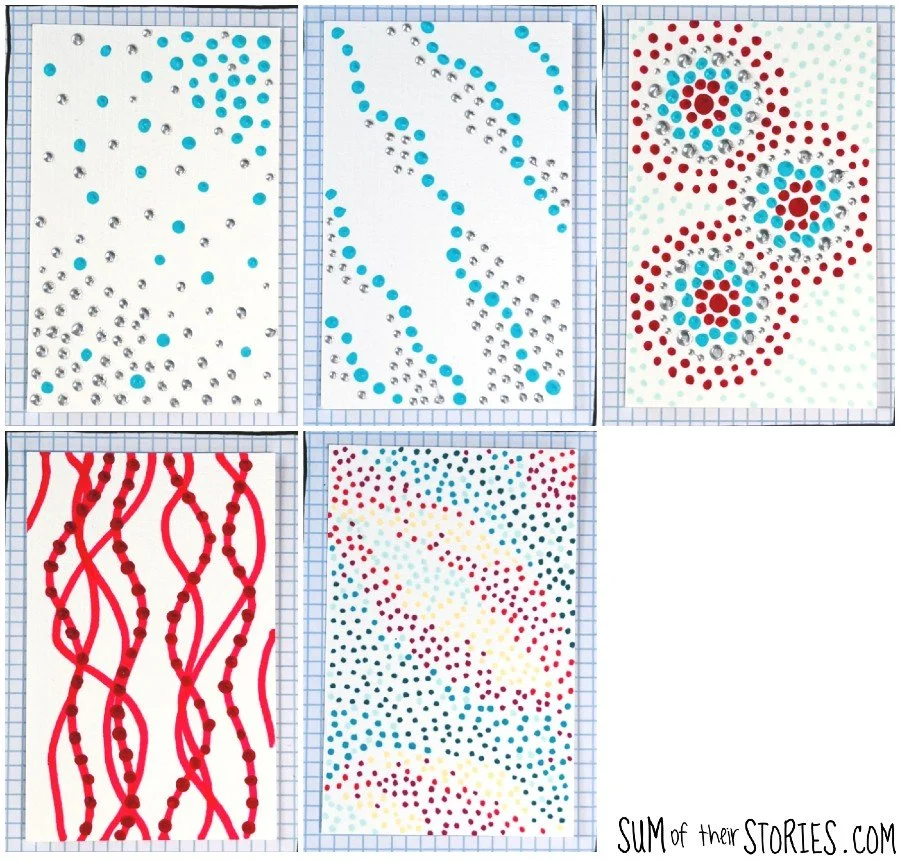
Grab some acrylic paint and an embossing tool or cocktail stick and get dotting, it’s as easy as that!
The red lines were draw first with a red sharpie and then dots added.
The last one is dots made by colourful sharpies rather than paint.
Lino Printing
I have a little set of lino cuts that I’ve made a while ago, cute small designs that I can mix and match. This is a great way for beginners like me to enjoy lino cutting without the pressure of big complex designs which are harder to cut and to print. I used ink pads rather than paint to print here which also makes everything easy and beginner friendly, plus it dries super quickly.

I used a limited colour palette for 2 reasons; I like how it looks (keeping it simple) and it’s what I had to hand!
Collage with Security Envelopes
I’m not gonna lie, this is one of my favourite sections. Collages made with the insides of business security envelopes. I just love the different patterns and had a lot of fun collaging with them.

This is just cutting and sticking (which was my favourite thing to do as a kid apparently!)
Bubble Wrap Printing
Acrylic paint in blue and turquoise dabbed onto bubble wrap and then printed.

I printed 3 of these as you can see but they came out more similar than I had hoped. I wanted every one of my 146 business cards to be a bit different so added pink dots with a sharpie to one and some doodles with a black fine liner and that “adequate but not brilliant” white Faber Castell Pitt Artist Pen Brush.
Colouring In
I wasn’t sure how to categorise this next batch. Colouring in? But I did also draw the shapes so I guess “drawing and colouring in” would be more accurate.

The first one, the tulip type flowers is one of my favourite from all these mini art pieces, it’s very much my cup of tea!
These were all done with sharpies and Promarkers.
Alphabet and Number Stamps
Two cards decorated with alphabet and number stamps.

On one card I used pastel coloured promarkers to add a shadow to the numbers and on the other I did some colouring in of all the “holes”. I actually LOVE this coloured in one because when I was at primary school I used to do this all the time and was always getting into trouble for it! Now I’m a proper grown up I can colour in the “holes” in letters and numbers and call it art - hooray!
Nail Polish Marbling

This is a messy but fun art technique that used up gloopy or sad old nail polish. It’s not something you can control very much so the results are a surprise, which can make it a lot of fun. I go through what you need to do nail polish marbling and how to go about it here: Recycled Plastic Valentine Hearts
Playing with Watercolours
Next are some business card art made with watercolour paints. I have very limited watercolour painting skills, but what I lack in experience I make up for in enthusiasm! I really love playing with watercolours, the effects can be beautiful and surprising.

Simple leaf shapes in various shades of green
Wavy lines in blues and greens
Bold colours for watercolour. I painted a yellow base colour then added some shapes and lines once that was dry
Watercolour blobs, with a black sharpie stem added once it was dry, and some leaf detail with a white pen
This was a fun technique I saw on Instagram from Andrea Nelson (I love her videos) You paint a wiggy line of paint then run a clean brush with just water underneath and watch the colour spread out
Watercolour vertical lines. Promarker dots around the edge and a plant pot cut from some pretty paper glued on once it was all dry
The bottom 3 cards are all the same technique, various watercolours shapes and doodles over the top of them with a black fine liner once the paint is dry.

These final 2 watercolour cards used anther fun technique. You take a piece of kitchen foil (or aluminum foil to my US friends) scrumple it up then sploosh some paint blobs on it in various colours. The card is then pressed onto the foil to create a nice blobby, sploshy background. To finish these 2 I drew a stem and leaves on regular white copy paper, cut them out and stuck them on.
Textiles

Ribbon scraps wrapped around the card and glued at the back
The next 2 cards are just tiny scraps of fabric glued to the card
Yarn scraps. This was quite a fiddle to do. I covered the card with glue and then attempted to stick down the yarn scraps. It was all very messy with a lot of glue covered yarn sticking to my fingers more than the card! I really like how it turned out and had originally planned to do more with different colours and patterns but after the hot mess I got into making this one it became a one off after all!
Scraps of frayed fabric layered and glued down, plus a couple of buttons
Various scraps of lace. I stitched the lace instead of glueing it, just stitching all over on random directions on my sewing machine (I have a seperate old needle that I use whenever I’m stitching on paper or card)
Wooden Block Printing
I have a nice little collection of carved wooden blocks for printing with acrylic paints. Most come from The Indian Block Printing Company and a few I’ve been given as gifts.

Rubber and Acrylic Stamping
Do we still talk about rubber stamping or is it all acrylic stamps these days? I went to call this batch of mini art rubber stamping and then realised that technically all my stamps are acrylic! Anyway, here’s some stamps on different backgrounds.

The first 3 background were all done with washable kids felt pens. I scribbled with the pens and then wet them with water and a paintbrush. Once dry I got stamping
This blue flower is a large stamp so I had the business card on scrap paper and the design overlapped the edge. I coloured the petals with promarkers, you can see how the alcohol markers makes the stamping ink run a little but I quite like that effect
I like the large flower stamp so much I tried it on an old book page too. I stamped it again on coloured paper for the flower and leaf and cut those out and glued them in place
The birdhouse one’s background was once again kids washable felt pens. This time I just dabbed dots all over and then wet them to make the colour run. I coloured in the stamp afterwards with colouring pencils
The rose in a glass was a watercolour circle with the stamp over the top once dry. I coloured in the tag with a colouring pencil
Embossing
I have a die cutting machine and some embossing folders so ran a few cards through that.

2 simple embossed cards just ran through the die cutting machine in embossing folders.
For the silvery one I embossed a clean flatted thick foil dish that a dessert had come in from the supermarket. The corners were rounded with a corner punch
This last one is a bit of an embossing cheat, it’s not really embossed at all. I had some strips of lacey effect cardboard, trimmed off some old greeting cards. They are glued on and then highlighted with a little chalk
Glitter glue
I’m not especially enamoured with either of these, a couple more mini art pieces that are not my best work! But I did promise you all 146 so here you go:

I found some old tubes of glitter glue that had been the kids. They were a little gloopy, I drew these 2 cards with them and then, to be completely honest with you, I threw them away!
Gelli Plate Printing
I had a gelli plate for Christmas last year and had a lot of fun playing with it so I have a nice little stash of mono printed paper in a variety of colours.

You can see similar cut out leaves as before that are just drawn onto regular copier paper with a black sharpie.
Collage
Another large section, I do enjoy a bit of paper collage. There is some crossover from the last section here too as the first few of these collages are done using gelli prints.
I generally glue paper with Pritt Stick glue most of the time.
Gelli Print Collage

This top 3 flower collages are some of my favourites of all these mini artworks in this project. I loved how they turned out and have been making some more slightly larger versions recently too.
Punched circles and hearts
These triangle collages look deceptively simple, in fact it was much harder to get this idea to work than I’d thought it would be. I cut loads of triangles from scraps but then they didn’t fit together very well. I ended up trying scraps of gelli prints in place, trimming a few mm off them and trying them again over and over until they fitted in the spaces. If there is an easier way to get this look I don’t know what it is!
For the second, similar collage I kept the pieces larger (and therefore easier to fit together) I added some words cut from an old book page for interest
Magazine cut outs
Flowers cut out from old gardening magazines on various backgrounds

2 backgrounds drawn with sharpies and one decoupaged scraps of an old book page.
I use cut out flowers like this quite a lot in my crafting, I just think old gardening magazines are such a good source of really large colourful flowers, seed catalogues can be great too. You can see where I’ve used them for other ideas: gift boxes, another gift box idea and simple greeting cards.
More collages

Can I even count this as a collage? A background painted with acrylic paint and then yellow punched hearts glued on to make butterflies. Details added with fine liner pen
A collage of scrapbook papers with some butterflies and flowers stamped on top
Strips of torn scrapbook paper glued on overlapping one another
Torn scraps of red and pink scrapbook paper, plus a tiny gem
Torn pink and red tissue paper layered up and glued on. Flowers die cut from old book pages were added once it was dry. The flower middles are just from a regular hole punch
This little stamped cake stand on a book page had been floating around my desk for months so it was nice to use it on this torn scrapbook paper background
More torn scraps of pretty scrapbook paper plus a paper flower and button. I don’t know if you can spot them but there are some tiny heart sequins on there too
This gorgeous blossom paper has a beautiful sheen to it and gold accent. It came from the wrapping of a box of chocolates some friends brought back for us from a trip to Japan
Old sheet music and a pink paper doiley, plus a paper flower and gem
Book page collage

Torn bits of book page decoupaged all over a business card then painted over with watercolours. On reflection I think some outlines might improve this one, maybe I’ll add some one day.
A background of splodgy acrylic paint and streaks of gold pen topped with some torn book page and cut out leaves and stems
And finally Miscellaneous
These last few card didn’t seem to fit very well in any of my categories.

Some little crocheted flowers and leaves
You might have done this “experiment” as a child. You take a black washable felt or marker pen and draw a big ol’ blob on a piece of kitchen paper then drip water on and watch the colours separate and spread. I did the “experiment” on the kitchen paper first and then once it had dried I glued it to the business card
Draw a design on the back of the card and then prick all the lines with a pin. I thought this one would look better than this but you win some you lose some!
This one was almost a disaster. When you were a kid did you ever do that string art where you cover a piece of string with paint, dollop it onto paper and then fold the paper in half and press down on it while pulling the string out? When you open the paper back out you are left with fun random art. That’s what I tried here but what I ended up with looked a little bit rude. Not wanting that for my art challenge I painted over sections with acrylic paint, and added some gems
This last one started as a watercolour background. Next I tried to splatter some copper paint (left over from this wooden bowl makeover) with a toothbrush. Unfortunately the paint was a bit gloopy so I ended up with a large blob. To make it look meant, I added more blobs! It was finished off with some drawing with a black sharpie
Phew! If you’ve made it to the end, well done!
There you have it, 146 mini artworks all done on the back of old business cards. I hope you might be inspired to try your own daily art challenge or just try out a few of the ideas here in your own way.

If you don’t happen to have a box of old business cards to decorate like I did you could use the backs of old greeting cards, or cereal boxes or cardboard packaging. Not every bit of art you make needs to be amazing. Sometimes it’s just about experimenting and finding out what you like; what you want to do more of.
There are definitely a few mini art piece ideas I’ve made here that I’ll be developing and creating more of and some that I will never be doing again!
Have I inspired you to create some art?
Julie
I’ll be sharing this art at some of these link ups