

Easy DIY Envelope Junk Journal
/

It’s really easy to make a junk journal from old birthday card envelopes, packaging and magazine pages or junk mail.
Junk journals are so much fun to make. They are perfect for the kids to make at the start of their summer holidays to keep mementoes of all the things they did or for adults to keep seed packets, coupons, tickets, photos, stickers, holiday memories etc in.
Today I’m joining the Do It Over Designer Challenge, when I join some of my creative online friends and we all bring you a creative idea to “do over” something you might already have. This time around our theme is PAPER, a great chance for me to show you how to take old paper envelopes and turn them into something new.
In fact, this easy DIY envelope junk journal is made almost entirely from things that might normally be thrown away, it’s a great low cost upcycling craft project. I used envelopes from old birthday cards so they all have a triangular flap but you could use envelopes with a long thin flap if that’s what you have. You can use envelopes that have writing on the front as that won’t be seen. At least 1/2 of your envelopes will still need to have the flap part attached though, so if you normally use a paper knife to open your mail you might need to stop for a while - just until you have enough envelopes to make your junk journal anyway!
Let’s get started.
How to make an easy junk journal from envelopes
You will need:
6, 8 or 10 envelopes, all ideally the same size
A cardboard packaging envelope
Pages of an old magazine or junk mail
2 lengths of thin ribbon - the lengths you can remove from the shoulders of new tops and dresses is ideal
Paper glue; I used both Art Glitter Glue (Bearly Art Precision Glue makes a good alternative) and a glue stick
Pencil, ruler, scissor or guillotine

There are lots of different ways to make an envelope junk journal. This method, where you glue the envelopes together first and then create the cover to fit is just the one I find easiest. I also like to have all my envelopes facing the same way but once you’ve made a journal this way you can play around with the envelope placement, add plain pages in there too, whatever takes your fancy - that’s the whole joy of a junk journal, no rights or wrongs!
Glueing the envelopes together
Start by glueing your envelopes together in pairs.

Lay one envelope flat on your work surface, flap open and apply glue to the flap.
Place a second envelope on top of the sticky flap, making sure the top and bottom are lined up. Cut off the remaining flap.
Repeat this for all your envelopes, so you have 3, 4 or 5 pairs.

Close the pairs of envelopes, like a book with the pockets inside, and then glue them together so you have a nice little stack. Make sure all the folds are on the same side and stack the envelopes are neatly as you can.

You will have a little book with envelope pages.
Prepare the Journal Cover

Take a cardboard packaging envelope (from a well-known online retailer) and cut the sides off so it opens out.
Place it printed side up on your work surface and place your “book” of envelopes so it lines up with the fold. Draw round with a pencil.

Remove the envelope stack. Measure and mark another line about 2/8” (1/2cm) outside of the first line.
Fold the cardboard back up and cut out along your second line. You are cutting through 2 layers of card but these card envelopes are not too thick so it should be manageable.
Assemble the Junk Journal

Place the cardboard cover opened out flat on your worktop, printed side up.
Apply a 2 inch line of glue centrally on each side and attach the end of your ribbon, one on each side. You want about 2 inches of ribbon overlapping onto the notebook cover so that your ribbon ties are nice and secure.

Apply glue all over the top of your envelope stack and stick it into the cover. Make sure you are lining up the folded edge of the envelopes to the fold of the cover - this is important or you won’t be able to open your book!
Then apply glue all over the back of the envelope stack and close the cover to fix in place.
Press under something like a heavy book while you leave the glue to dry for a few minutes.

Decorate your Junk Journal
Whilst your junk journal glue is drying you can prepare everything you need to decorate it.
Take your old magazine or junk mail pages and cut them into long strips. Mine were about 1/2” or 1cm wide but they varied a little. I also cut out some flowers as I was using pages from an old gardening magazine.

Decide in advance how you are going to arrange the strips. I alternated between mostly green strips and the strips with pinks and purples but what you do will depend on what pages you are cutting up. Alternate dark and light looks great, or you could mix up colourful pictures and text. Spend a few minutes playing around until you are happy before you start attaching them.

Apply some glue to the front of your junk journal and start glueing the strips of magazine on. I found it easiest to apply the glue about an inch at a time, starting from the left side. Stick down a couple of strips and then apply more glue and so on. For this part I was using a stick glue and they dry pretty quickly.
When they are all stuck down, trim the excess.

You could leave the decoration there, the stripes look pretty good on their own I think, or add more.
I’m going to use this junk journal to hold seed packets and garden plans so I decided to add a cut out flower. You might want to add a label you can write or print on.

Decorate the inside of your junk journal
Now you can let loose and decorate the inside of your junk journal. Do this any way you like, just make sure you don’t cover the envelope openings or you won’t be able to put anything in them.
As I’m going to use my junk journal as a bit of a garden planner and keep packets of seeds in the envelopes I’ve gone for a flower theme. I’ve left a little bit of space so I can write what I’ve planted where or what I plan to plant where! I’ve got some little envelopes that I use to save seeds from last summer so they can go in here too.

You can decorate inside your junk journal all in one go and then use the pockets to store “stuff” or you can decorate and fill it gradually. You can write, draw, stamp, collage - whatever takes your fancy. The only thing I wouldn’t recommend is paint or marker pens like felt tip pens, sharpies etc. Envelope paper is pretty thin so paint and most marker pens are likely to seep through and that could spoil the other side.


I made a version of these envelope note books with a group of friends at a craft night a little while go. We all used different scrapbook papers to create our book covers instead of the packaging envelope and raided my papercraft stash for embellishments. What was really fun was to see how different everyone’s book turned out.
As you can see in the photo, some people used longer lengths of ribbon for these books so they wrapped right around the junk journals. They were fixed in the same way but are just much longer. Somewhere between 15” - 20” (38cm - 50cm)

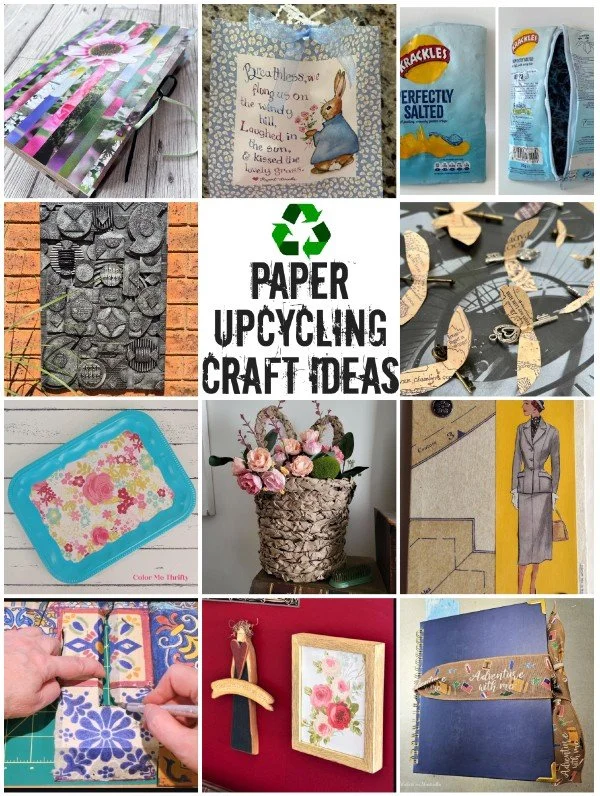
Now it’s time to see what the other Do It Over Designers have come up with for this month’s PAPER themed challenge:
Pandora’s Box - Gift Bag from Old Calendar
Purple Hues & Me - Kenya Snack Souvenir Zipper Pouch
Unique Creations by Anita - Textured Cardboard Wall Hanging
Tea and Forget-Me-Nots - Harry Potter Winged Keys
Color Me Thrifty - DIY Thrift Store Tray Makeover
Vintage Style Gal - DIY Easter Basket
The Apple Street Cottage - Upcycled Vintage Sewing Pattern Art
Birdz of a Feather _ Decoupage Tips and Hints
Exquisitely Unremarkable - Shadowbox Thermostat Cover
Modern on Monticello -Old Planner to Travel Themed Junk Journal


