

No Sew Scrap Fabric Tassel Bag Charm
/

Bag charms are having a fashion moment apparently. I say apparently because anyone who knows me in real life knows that I’m no fashion or style guru, far from it! I know what I like and that’s what I wear but I have seen cute bag charms all over the place recently, especially my Instagram feed.
I’ve always loved bag charms, some of my older bags have never been without them so it’s nice to know they are on trend again. If you wait long enough your favourite things are bound to come back in fashion aren’t they?
Last week I shared a really quick and easy way to make a scrap fabric tassel keyring and promised another no sew tassel idea so here it is.
Let me show you how to make a pretty tassel bag charm from thin scraps of fabric. These scrappy fabric tassels also make great keyrings if you prefer.
Normally I would sew a tassel like this and I can show you what that would look like at the end but I realise that not everyone enjoys using a sewing machine or needle and thread so this is a no sew tutorial.
How to make a no sew fabric tassel bag charm
Materials needed for a fabric tassel bag charm

Scraps of fabric
A keyring finding of some sort - you can use any kind
A hot glue gun and hot glue (or a cold glue gun if you prefer)
Some kind of cord - mine is the handle of an old gift bag but any strong cord or even ribbon would work
Prepare the scrap fabric
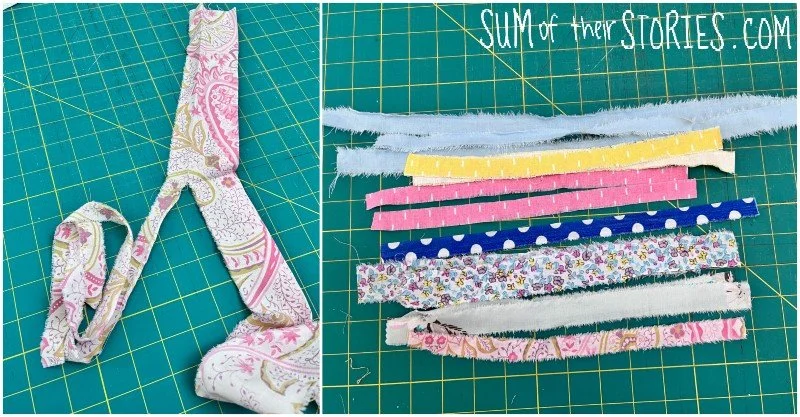
Start by tearing your pretty scrap fabric into strips. They can be any width you like but I found about 1 - 1.5 cm (around 1/2”) is about right.
Just cut a tiny snip in one edge and pull firmly holding both sides of the snip. You’ll find that some fabric tears more easily than others. If your fabric doesn’t tear easily you can cut it with scissors and then pull a few threads away to give the frayed torn look. It’s not cheating and no one needs to know!
You need 10 strips that are each 28cm (around 11”) in length.
Prepare the top of the tassel
For the tassel top you need a wider piece of fabric. Something about 20cm x 5cm (8” x 2”) will work well.
Fold and press it in half, lengthwise.

Open it out flat and fold the edges to the middle crease. Press again. It will look like double folded bias binding. (I really think it might be time for me to invest in a new cutting board, right?!)
Assembling the fabric tassel

Place your tassel top - the double folded length of fabric - right side down and apply a little hot glue along both folded sections. Glue your torn fabric strips perpendicularly (that’s a word I’ve not used since school!) face down along the length centrally. You might find it easier to apply the glue to a small section, an inch or so at a time, so that you can glue the strips on before the it sets.
This is a little hard to describe, use the photo above to guide you.
When all the strips are in place apply a line of hot glue along the centre of the strips and fold them in half.
Take your cord and thread it through your keyring finding.

Tie a knot about 4-5cm (just under 2”) from the keyring. We are adding a knot to make the bag charm more durable.
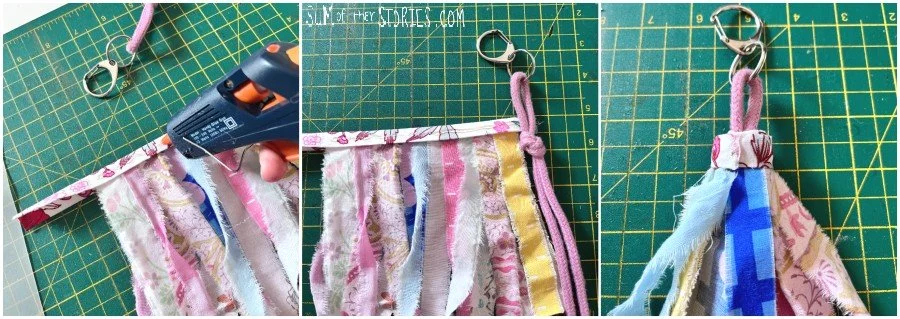
Apply a line of hot glue along the length of the tassel top. Place the cord at the end, with the knot just below the top strip and roll it up. Apply a little more hot glue at the end to secure and then trim any excess fabric.
When the glue is set, lay the tassel flat and trim all the strips of fabric and cord to whatever length you like.

Give it a good shake to “fluff” the tassel up and it’s ready to use.

You can see here how the knot is inside the tassel, completely covered by the fabric strips.
Now all you need to do is attach your lovely new fabric tassel to your bag, as a bag charm.


You could use it as a keyring if you prefer, or attach it to your planner, a lanyard or anything else you want to add some tassel fabulousness too!

The Not No Sew Version!
If you prefer to sew your crafts you can just replace all the hot glueing with stitching. You can see how I did that here, with this stitched version.

You roll up the tassel as before then take a long length of thread and stitch straight through the circle of fabric, pushing the needle straight through from one side to the other. You might need a thimble to protect your finger - I know I did.
So that’s 2 easy ways to make pretty tassels from fabric scraps. This idea that uses hot glue and a cord centre, and last week’s tutorial that used embroidery thread.


Do you have any long thin scraps of fabric that just need to be turned into pretty tassels?
Julie
I’ll be sharing this idea at some of these link ups
You might also enjoy these other scrap fabric ideas:


