Simple Doodle Button Flower Cards
/What to make a cute and easy card to send to a loved one? Of course you do!
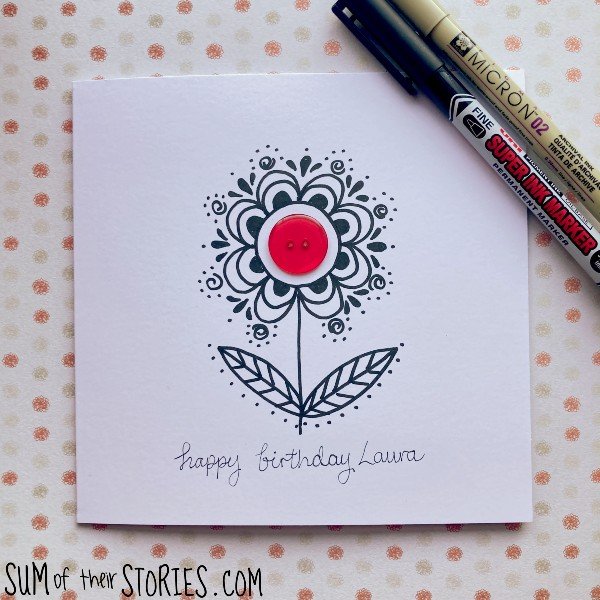
Here is a simple idea to doodle a flower on a greeting card. Just add a button and a message and it’s ready to post.
I had SO much fun making these cards, once I started I just kept having more flower ideas that I wanted to try so quite a lot of people I know have been given these cards recently!
Doodling flowers is easy, especially if you break it down to simple steps and build your flower up.
If you are an experienced doodler then you probably don’t need any more help from me, but if you are unsure how to get started you might like to copy the cards I did exactly to begin, until you get the hang of it and feel more confident.
How to make pretty doodled flower greeting cards
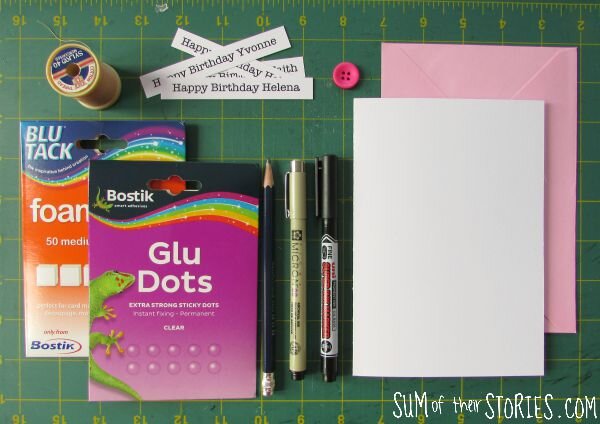
To make your own doodle button flower cards you will need:
Card blank and envelope - I used 5”x 7” white cards
Black marker pen - mine is a Uni-Ball Super Ink Marker
Black fine liner pen - I used a Pigma Micron Pen 05
Pencil and eraser (not in the photo, ops!)
Glue Dots (PVA glue would work instead)
A button (*or a circle of card - see details below)
Printed greeting
Something small and round to draw around
How to start a simple flower doodle
For most of the flowers I find it helpful to start by drawing around something round in pencil. I used a cotton reel, just because it was to hand but a large coin would work well, or maybe a bottle top.
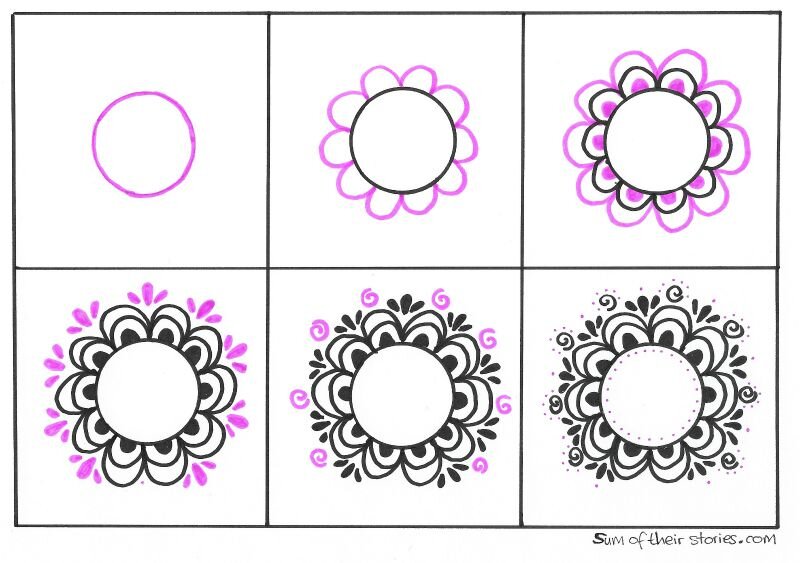
I drew petals first. It’s easiest to get them even if you think of a clock face and do one petal at 12 and one at 6 to start with, then 9 and 3. Then you can fill in with one or two petals between. (depending on how wide your petals are)
Then you add some lines, dots, swirls, whatever takes your fancy. If you look at the step by step photos you can see how I built the flower up a little at a time. The hardest thing is knowing when to stop!
Once you are happy with your flower, draw a straight stem and add some leaves. (Don’t pay any attention to the white balance in these photos!)
Attaching the button
Rub out any pencil lines and then add a button. You can use a strong pva glue for this but my favourite way is to use glue dots.
Adding a sentiment
Last fix a sentiment underneath the flower using foam pads.
I created these sentiments on the computer, just using a basic font in word called American Typewriter. I printed them on card and them cut them out.
If you feel confident with your handwriting you can just write a sentiment as I have done here. (In my best twirly writing of course!)
Although the flowers look quite complicated when you break them down they are not. You just start with some basic petals and the add more dots, swirls and lines until you are happy. You can copy mine or just wing it with your own.
I made a few little gift tags from scraps of card to match. I have a lovely tag punch which give that pretty top edge.
Step by step flower doodle guide
To help you out with doodling your own flowers I’ve made a few of printable sheets with the steps I took broken down for you to copy over for practice. You can click on them and it should take you to a printable version.
Update: You may find that if you are wanted to send these cards in the post that the button makes them a little thick. I don’t know what the postal service is like where you are in the world but here in the UK if an envelope is thicker than 5mm it needs a large letter stamp instead of a regular one. You might want to keep postage costs down and replace the button with a circle of card, I used a few scraps of purple mirror card here and a 1” circle punch and heart punch.
It just gives you another option, use what is in your stash or that you have to hand.
Have fun with your doodles!
Julie
I’ll be sharing this idea at these link ups
If you love to doodle you might like to check out these other doodling ideas:


