

Embroidered Aran Sweater Bag Upcycle
/
What’s your longest running craft project? I’ve had a few makes that have taken a few months or even years but this is probably my record breaker. I started it about five and a half years ago!
It’s time for another Sustainable Craft Challenge and this month out theme is TRANSFORMATION. I join some of my creative blog friends and we each bring a craft idea with a sustainable, recycled or upcycled twist. This was just the push I needed to get this sweater upcycle out of the cupboard where it was languishing half upcycled and get it finished.
Before we start I must apologise for the way I switch between calling this a jumper and a sweater throughout this tutorial. I’d normally say “jumper” but I know that means something else in other parts of the world. Let’s just think of it as a wonderful language and culture exchange!

How to embroider and old aran sweater to make a bag
To make a similar bag you will need:
An old aran sweater with a cable design
Scraps of yarn in bright colours
A large needle
Large sharp fabric scissors
Lining fabric, an old curtain is ideal
A sewing machine
Let me start at the very beginning (but feel free to skip my long story if you just want to get to the tutorial, I won’t be offended!) This cable knit aran sweater was knitted for me by my mum way back in the late 1980’s. Cable knits were always one of her favourite things to knit. I wore this jumper a lot over the years but I’ve not been able to find any photos of me wearing it. To be fair, back in the 80’s and 90’s before digital photography we only really took photos on holiday or special occasions and a big thick jumper like this is not something I would have worn for either of those things.

At some point I spilt something (I think probably tea) on the front of this hand knitted jumper that just wouldn’t shift. I tried everything I could to get the mark out but it just wouldn’t budge and all my cleaning endeavours had started to felt the fibres in that patch. I decided to bite the bullet and felt the whole jumper so I could make something else from it.
This jumper is pure wool so it felted really easily, just a hot wash in the washing machine and it had shrunk up and the fibres had started to matt nicely.

Slightly annoyingly the hot wash felting process did remove most of the stain!
I don’t know if you can tell from these photos, the jumper is on the same striped surface, but it did shrink quite a bit and the fabric really thickened up.
All of this was happening back in early 2019 and I came across the work of Katie Jones the textile designer. Katie mostly does crochet design these days but a few years ago she was showcasing her beautiful embroidered cable knitwear and I fell in love. It felt like destiny, my old, stained and now shrunken jumper that my mum had so lovingly knitted for me some 30+ years ago needed to be given a bright embroidered makeover. If you knit or crochet at all and don’t know Katie’s work I do implore you to check it out. Her Instagram is a feast of colour. Our daughter crocheted her Day Tripper blanket and found it was a fabulous way to really expand her of crochet knowledge and skills. Katie has run workshops teaching her aran embroidery techniques in the past too.
Embroidering an old aran sweater
I grabbed some DK yarn in vibrant colours and started stitching. I’ve not done one of Katie Jones’ workshops; this is a very simplified homage to her idea. I did mainly straight stitches in places where I thought they would look nice, just keeping it pretty simple. The different colour of the jumper in these photos is just the light, evening vs daytime.


The back isn’t especially neat, but I did take care not to pull the yarn too tightly so the felted knitted fabric didn’t pull out of shape.

You can see that I only embroidered up to the arm hole of the sweater as I had decided this was going to be a bag. Although my stitching is much simpler than Katie’s original inspiration this is still pretty time consuming. I didn’t want to stitch any more than necessary.
And this is where this project got to back in 2019. And then I stopped, and this stayed in a carrier bag in the cupboard for 5 years. Truth be told, I wasn’t exactly sure how I was going to proceed. Would my sewing machine be able to stitch this super thick felted fabric? Would I have to hand stitch it? Should I try to cut the bag pieces and then crochet them together somehow? I really didn’t want to stuff this up - I would be cutting up a jumper that my mum had made for me, precious memories were at stake.
But it really wasn’t honouring all my mum’s hard work to leave this sweater in a bag so when this month’s Sustainable Craft Challenge came along I gave myself a little pep talk and got busy finishing this transformation from stained sweater to the bag it was destined to become.
Turning an old sweater into a bag

Start by cutting the sweater straight across just under the arm holes. Gulp! No going back now!
Turn the embroidered sweater piece inside out and stitch across the cut edge. This cut edge is the bottom of the bag and the old ribbed sweater hem will be the top.

As I said before I really wasn’t sure how my pretty basic sewing machine was going to cope with the thickness of 2 layers of felted sweater. It turned out much easier than I was expecting. I set the machine to the longest stitch (4) and just went really slowly.
The dimensions of my jumper meant that left like this my bag would be much too wide so I also stitched side seams in about 2 inches from the original side seams. I’m not sure why but I’m afraid I didn’t take any photos of this stage. This is the bag after I’d stitched those side seams and trimmed off the excess.


To make things more secure and to make sure nothing is going to start unravelling I’d recommend sewing these seams again on the edge with a wide zig zag stitch. I guess you could overlock/serge the edges but as I don’t have an overlocker/serger I don’t know if it would cope with the bulk of the fabric. The zig zag stitch on a basic machine has worked really well.
Next double up your lining fabric and then take your knitted piece and lay it on top. Cut around leaving a seam allowance all around of about 1” plus a little more at the top for turning an hem.

My fabric has a fold on that right side so I didn’t allow a seam allowance there. If you are piecing 2 separate pieces of fabric then obviously you’ll need to allow a seam allowance all round.

Sew the lining fabric along the side seam and bottom edge.
Make the handles
Cut 2 lengths of lining fabric, each one 24” x 3” (60cm x 7.5cm)
Fold each strip so the edges touch in the middle and then fold in half and pin.
Top stitch along both long sides.

Assembling the bag
Turn the knitted bag right side out and slip the lining inside so the wrong sides of the bag and lining are together and the lining side seam matches up with one of the outer knitted bag side seams. Gently manoeuvre it into place, making sure the corners are pushed right in nice and snug.


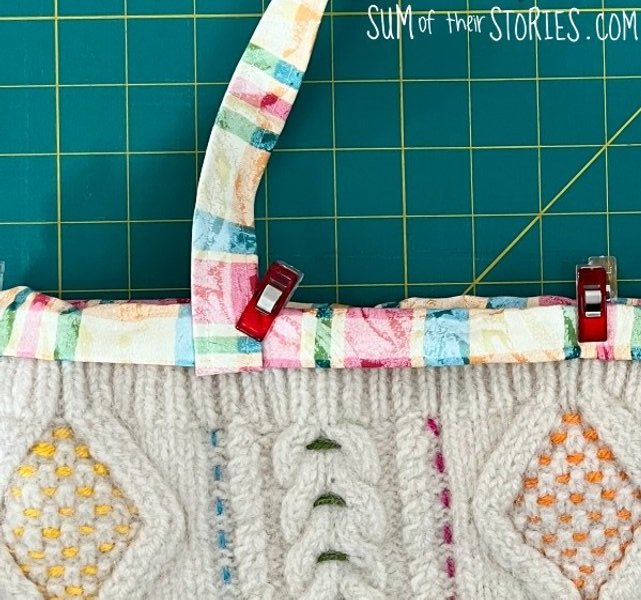
Fold a small hem at the top then fold again level with the knitted edge so you have a double hem along the top edge of the bag. I secured this with clips as it was a little too thick for pins.
Tuck the ends of the handles under the folded hem, about 3-4” from the edge is about right but exactly where you position them depends on the dimensions of your bag of course.
To secure the handles I would normally fold them back on themselves (so they are pointing upwards in the right direction) and then stitch straight across them with the top stitching.
This was the point when my poor old hardworking sewing machine said “no more”! I just couldn’t stitch through all those layers so I left the handles facing down at this point.

Top stitch around the top of the bag to secure the double hem lining in place. The knit can stretch out of shape a little even when felted so having this hem of lining fabric around the top makes it nice and firm.
Those handles still need to be secured though. If your sewing machine is super substantial and can cope with it then stitch a cross or square at the base of each handle. I did this by hand, using a strong thread, a sharp needle and a thimble! I stitched a cross, and also oversewed all around the base of the handle too. Hopefully these bad boys aren’t going anywhere.

That’s it, my beautiful embroidered aran sweater upcycled bag is finished. Took me longer than it needed too but was totally worth the wait.

If you have an old aran sweater with a cable design, or if you can find a suitable one in a charity shop or thrift store, why not give it a go and turn it into a beautiful embroidered bag. You don’t even need to spend over 5 years making it!!
The embroidery part of this transformation did take a while; probably 3 or 4 evenings. The actual bag construction only took a couple of hours.
It’s a great way to use up small scraps of yarn too. I went for bright colours but you could embroidery with any yarn you have.


I’m thrilled that I was able to transform this precious sweater into a useable bag. I have a lot of craft projects on the go at any even time and I like to keep each one in a separate bag to make it easier to grab whatever I fancy working on. This bag is already in service for transporting my latest crochet project.
Now let’s take a look at what my creative blog friends have transformed for the Sustainable Craft Challenge.
Our Good Life : Transforming Mason Jars into Solar Lights
Purple Hues and Me: Busted Canvas on Bottle Transformation
Christine’s Crafts: Denim Jacket Upcycle
Modern on Monticello : Transformed Truck Suspension Spring to DIY Bird Feeder Stand
Vicky Myer’s Creations: Cover a branded logo on a bag
Old Rock Farmhouse: Cultivating Autumn Arrangements
Decor Craft Design: Transform a Vintage Powder Case into a Jewelry Box


